The Art of Jewelry Making
Jewelry making spans the history of mankind. It has evolved from the time of primitive man fashioning a stone or any other found object into a wearable personal statement, to today's artist/designer/jeweler who combines a variety of metals and gemstones into an object of desire.
Today, as in the past, jewelry is often a blend of fashion and functionality. This unique hybrid has been used to interpret what our habits, rituals and values may have been throughout history.
Today's jewelry although produced with the benefits technological advances, still finds it's origin in the imagination of the jeweler.
Jewelry Design
Whether you are selecting a manufactured mounting or choosing to design a ring to accommodate your specific needs craftsmanship is an integral part of the design process.
Before deciding on a design, it is advisable to spend time looking into a variety of settings with diamond(s) or other stones comparable to the stone(s) you are incorporating into your own jewelry items.
It is also important to remember that design must conform to the technical realities of the manufacturing process, as well as the practical realities of wearability.
Building a Piece of Jewelry
Major considerations in selecting a uniquely designed, custom ordered piece include:
The design itself can be realized through the consultative process with a jewelry professional who has experience in communicating your desires to a bench person who can create, from a pencil sketch and conversation the finished article you envisioned.
Handmade (100% From Scratch)
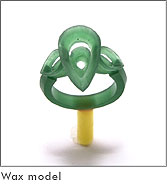
As you may have begun to realize, the design process is an involved procedure. The making of your jewelry design involves a number of steps and skills to achieve a finished piece based on your design specifications.
There are two basic approaches to creating a finished article of jewelry. One approach involves creating an exact wax model of your design. The other is working in metal, fabricating the design directly in the metal(s) of choice to accomplish the same end. The appropriate approach often is determined by the design itself.
Fabrication
Fabrication involves working directly in metal using the various shapes and gauges of wire and/or sheet metal. This process requires the forming, bending, and/or forging of the metal into the appropriate design, i.e. a ring. The jeweler will utilize a variety of hand tools to accomplish his task including hammers, mallets, files, saws, pliers and torches to accomplish his task.
Should the design of the finished item be outside the parameters of a fabricated approach or be limited by the properties of the material, say, gold or platinum, it may require that a design maybe created in wax as opposed to directly fashioned metal.
The advantage of executing a design in wax is that it allows you to view the piece as it will appear in metal. Of course, you will be viewing it in a green, blue or some other wax color and not as it will ultimately appear in your metal of choice.. In this instance you will have to apply your imagination in order to visualize the finished piece.
Hand Finished
A hand-finished piece may incorporate a combination of fabricating techniques as well as cast components. A unique ring shank design may be fabricated while a conventional setting for a standard size stone may be cast from a mold.
Machine Casting
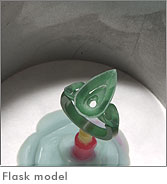
Once a wax model has been approved for completion it is prepared for casting. This process is known as the "lost wax" process. This is because, the wax is eliminated from the mold during the burn out stage, leaving an empty area that retains the exact impression of the original wax model.
Prior to the elimination process the model maker attaches a wax sprue to a predetermined area of the model and positions it atop a cone-shaped rubber mold base. This cone shape and the sprue, when eliminated in the burn-out stage, will become an access canal through which molten metal can flow, as well as a vent to allow the escape of hot gases during the actual casting of the model.
With the sprue attached to the cone shape rubber mold base a steel flask is inserted into the rubber base. This assemblage resembles a soup can with the top and contents removed, inside stands the wax model supported by the sprue atop the cone shape center of the rubber base. The empty space within the flask is filled with a plaster of paris material called investment. Unlike plaster of paris investment it is able to withstand temperatures approaching 2000 degrees. An important difference because the burn out procedure taking up to 5 hours will reach temperatures approaching 2000 degrees. This allows for the complete elimination of the wax and any lingering residue.
Once the investment has been poured into the flask it is placed under a bell jar on a vacuum table where all the air is removed from the mixture creating a solid mass encasing the wax model. When the investment has set the rubber base is removed from the bottom of the steel flask and the flask is placed into the burn out oven. After a several hours at increasing temperatures the wax is eliminated. Once the optimum temperature has been achieved the flask is removed from the burnout oven and placed horizontally on a centrifuge.
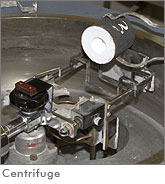
The centrifuge is sometimes referred to as the casting machine. It is used to transfer the molten metal from the crucible to the interior of the flask filling the empty space once occupied by the wax model. For gold casting the centrifuge is comprised of a horizontal steel arm that is balanced on a spring-loaded base. The arm is wound several times and held in place by the machines stop device. When the metal has achieved the ideal temperature the stop is released and the steel arm is allowed to travel free in a circular motion at the equivalent of a "g" force.
Today modern centrifuge as some of these processes automated to insure a higher quality of finished casting.
The completed casting is removed from the cooled flask, the sprue and any remaining investment removed in preparation for the finishing process.
The Final Touch
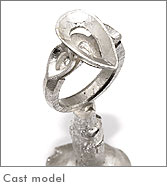
The cast model Requires a variety of finishing including grinding, filing, sanding and pre-polishing techniques in anticipation of setting the diamond(s).
Setting
The polishing procedure is the application of a final finish to the completed piece of jewelry. It is a multi-step process involving a pre-finishing procedure using a slightly abrasive compound known as Tripoli. This compound is applied to a buffing wheel that is attached to a tapered spindle on a polishing machine. (A jeweler will maintain a variety of buffing wheels for the various jewelry metals).Tripoli will remove any minor scratches that a jewelry item may have acquired during the manufacturing process. The final polish utilizes another buffing wheel charged with the polishing compound, Rouge. This will provide the bright lustrous finish.
Molding
In order to duplicate a particular mounting, a mold of the item must be made. The molding process involves a number of steps to re-create the item. Once an item as been pre-finished and before any stones have been set in the piece, a sprue is attached to the item to act as an inlet for hot wax to flow through, as well as a vent for air to escape.
Now the mounting is placed in a molding frame, which is first packed with a layer, or layers, of vulcanizing material, upon which the item is to be placed. The remaining vulcanizing rubber is then packed on top of the item, securely sandwiching it in place.
Once the item is packed into the molding frame and two thin metal plates are placed on either side, the assemblage is then placed into the Vulcanizer. The Vulcanizer has a flat, heated, stationary base plate and an adjustable, heated, upper plate, which is then tightened down onto the molding frame sandwiching the mold between the heating elements. Under pressure, it is heated to 350 degrees for a pre-determined period of time, causing the layers of vulcanizing rubber to solidify into one solid mass, encasing the item that is being molded.
When the proper amount of time has elapsed, the mold is removed from the Vulcanizer and allowed to cool before it can be opened to remove the mounting. Once cooled, the mold maker will make a series of specific cuts into the solid block of molded vulcanized rubber. Upon completion, the mold will be separated into two separate halves (a top and a bottom half, each with it's respective impression of the mounting) and the mounting will be removed, leaving an exact impression of the jewelry article.
The completed mold halves, when placed back together, contain an exact negative (empty) space of the article molded. This area of negative space will be injected with pressurized, liquid wax , re-creating a wax duplicate of the original item that can now be cast in the metal of choice.
Plating
Electroplating is the electro-chemical process of depositing a thin coat of metal on the surface of a metal object. Electroplating is achieved utilizing an electroplating rectifier whose electrical current is directed between two electro conducting materials, (an anode, a positive terminal, and a cathode, a negative terminal) each submerged in a chemical solution/bath that allows the electro-disposition of one metal onto the surface of another metal.
In observing the plating process you will note that the article to be plated (a ring) is attached to a wire from the positive terminal of the rectifier, making it the cathode. Attached to the negative terminal you will note the metal (gold, silver, rhodium etc.), comprising the anode that is to be deposited upon the surface of the ring. Both are submerged in beakers containing an electrolyte solution. With the solutions at precise temperatures, the electrical current supplied via the rectifier deposits a thin coating of the metal anode upon the surface of the ring.
Different Types of Plating
Gold plating involves depositing a gold, either white or yellow, of 10, 12, 14, or 18 karat either onto the surface of another metal or onto the surface of the same metal of another coloration, i.e. white gold plating of an area of a yellow gold ring.
Rhodium plating involves depositing a thin layer of rhodium onto the surface of another metal, i.e. rhodium on a sterling surface.
Setting a gemstone includes a number of procedures in order to securely place the stone in the mounting. These procedures vary depending on the type of setting utilized.
Prong
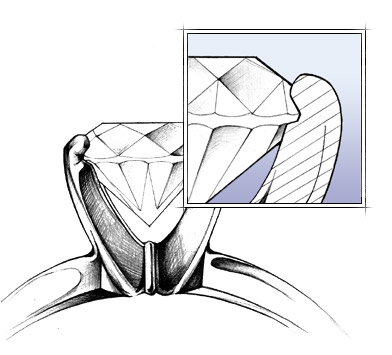
The most popular and traditional style of setting is the prong setting, often referred to as a "Tiffany Setting", after Charles L. Tiffany, who first introduced it in 1886. This setting most often incorporates four or six individual fingers of metal that hold a stone in place. When a stone is prong set, each prong is cut to fit the crown angle and pavilion angle. The upper parts of the prongs are then bent over the crown in order to securely set the stones.
Bazel
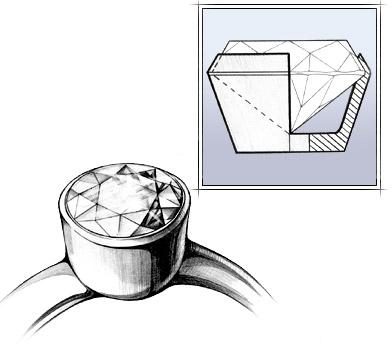
A bezel setting is comprised of a band of metal that encompasses the stone, surrounding the stone's diameter. It has been most commonly used to set cabochon cut stones (half-domed), though it is a popular setting choice for faceted stones as well.
Half-Bazel
A half-bezel setting is similar to a bezel setting, except the bezel does not entirely surround the stone. Instead the bezel encompasses the outer portion of the stone, allowing the center section of the stone to remain open. This allows additional light to create a higher degree of brilliance.
Bar
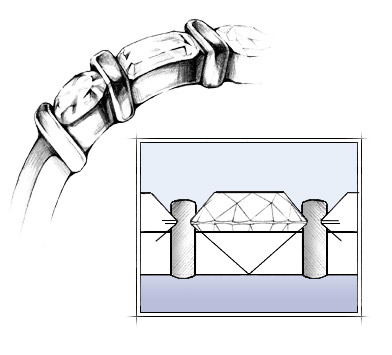
In a bar setting, the diamonds are set between bars of metal perpendicular to the band. This type of setting incorporates a combination of classic and contemporary jewelry setting styles.
Channel
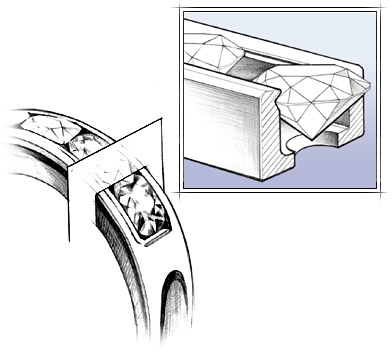
With a channel setting, the stones are set between vertical walls of metal. In this style of setting no metal separates the stones from one another. Channel setting has gained popularity and although contemporary, it is considered a classic style.
Pave
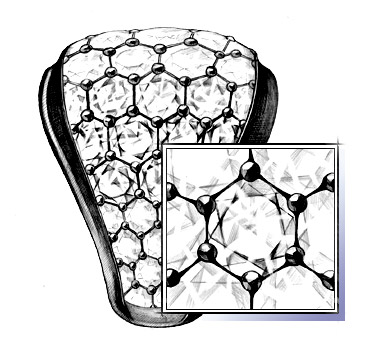
A pave setting is a style of setting that sets the diamonds almost flush with the surface of the mounting, utilizing raised beads of the surrounding metal to group individual stones in such a way as to give the impression of a continuous diamond surface.
Tension
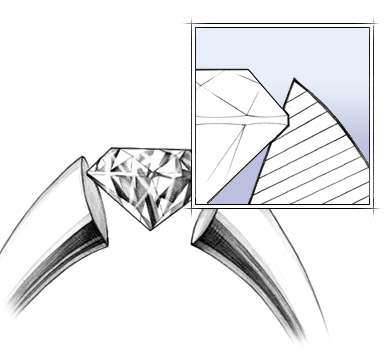
At Simayof you may experience our version of the tension setting in our Floating Diamond Collection. This unique setting style is made possible through the use of a special platinum alloy.
Invisible
An invisible setting utilizes a gem cutting technique that grooves the stone at the girdle so that the adjoining stone(s) may be fitted, next to one another, appearing framed in the mounting itself.
